Welcome, fellow dog enthusiasts, to a delightful corner of canine wisdom! Today, we embark on an adventurous journey into the whimsical world of Dog Gate Installation. Picture this: a harmonious blend of wagging tails, soaring imaginations, and a touch of DIY magic. Dog gate installation doesn’t have to be another chore on your list!

Whether you have a mischievous puppy with an insatiable curiosity or a dashing hound who believes home is where the squirrel-chasing action is, fret not!
We have gathered all the essentials you need to know about installing a dog gate with a sprinkle of enchantment and a dash of sparkle. So, grab your toolkit, put on your imaginary wizard’s hat, and let’s dive into this delightful escapade of keeping our furry friends safely contained. Poof!
How to Install a Pressure-Mounted Dog Gate
Pressure-mounted dog gates exert force on either side of a doorway, hallway, or stairway to secure themselves in place without the need for permanent dog gate installation.
These gates are easy to install and do not require any tools or drilling into walls, making them an excellent option for renters or those who want a temporary solution.
Installing a pressure-mounted dog gate is one of the easiest and most common ways to keep your furry friend in check. To begin with, choose the appropriate location for the gate.
The majority of pressure-mounted gates are designed to go between walls, doorways, or other flat surfaces. Always ensure that the gate is installed on a straight and even surface.
Installing a pressure mounted dog gate
If you’re installing on an irregular surface or a stairway, use hardware-mounted gates instead. Once you’ve determined where your pressure-mounted gate will go, measure and adjust the width of the gate panels to fit snugly into your chosen space.
Most dog gates have adjustable panels that expand or contract to fit various widths. Tighten any screws or latches that may be present on each panel before placing them into position at both ends of your chosen location.
To activate the pressure mount mechanism, push down firmly in the center of the top bar until it clicks into place against each wall or doorway.
Your pressure-mounted dog gate should remain securely in place without additional hardware.
Tips for Ensuring Proper Installation
While installing a pressure-mounted dog gate is relatively easy, there are several things to keep in mind to ensure its effectiveness and longevity.
First and foremost, ensure that all screws and latches are secure before attempting to install your gate; loose parts can cause instability or breakage over time.
Also, make sure that your chosen installation site has sufficient clearance for both humans and dogs while allowing enough space for movement through it; cramped quarters can create stress for both people and pets alike.
It’s important not to rely solely on a single pressure-mount dog gate as an effective barrier against more significant forces like large dogs or children leaning against it heavily enough to push through. In such cases, consider using hardware mounted options instead for added stability and peace of mind.
How to Install a Hardware-Mounted Dog Gate
Hardware-mounted dog gates are permanently installed using bolts, screws, and brackets that attach to wall studs or banisters. These gates provide more stability and security than pressure-mounted ones and are ideal for larger dogs who can exert more force.
Install a hardware mounted dog gate
Installing a hardware-mounted dog gate requires drilling holes into the wall or door frame, so choosing the right location beforehand is important.
Make sure that the area where you want to install the gate is free of electrical wiring and plumbing pipes and that there is enough space for the gate to open and close smoothly. Once you have chosen your location, follow these steps:
1. Assemble your hardware-mounted dog gate according to the manufacturer’s instructions.
2. Hold the gate up against the wall or door frame where you want it installed.
3. Use a pencil to mark where you will need to drill holes for screws.
4. Use a drill bit that is slightly smaller than your screws, and drill pilot holes through each marked point on the wall or door frame.
5. Insert wall anchors into each pilot hole if necessary (check manufacturer’s instructions).
6. Align your gate with the drilled holes and attach it using the screws provided with your kit.
Tips for Ensuring Proper Installation
To ensure proper installation, make sure that all screws are securely tightened into place before letting your dog use their new gateway.
If some areas are not secure, double-check that all parts of your hardware-mounted dog gate are properly aligned before attempting adjustments. When choosing its installation location, it’s also important to consider how often you’ll need to move or relocate your dog gate.
Remember that this dog gate isn’t easily moved around once drilled into place like pressure-mounted gates.
If you’re having trouble getting everything lined up perfectly during installation or are unsure about drilling into walls or door frames, consider hiring a professional handyman who can install it safely and securely on your behalf for peace of mind knowing that everything has been done correctly!
How to Install a Freestanding Dog Gate
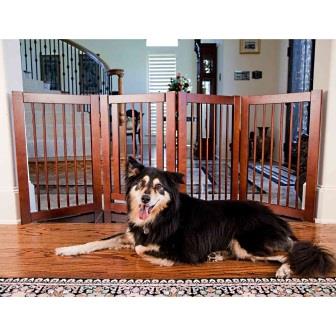
Freestanding dog gates are a great option for pet owners who want a flexible and easy-to-install gate solution without hardware or mounting. These types of gates are also highly versatile, as they can be easily moved from one location to another around the home.
To install a freestanding dog gate, follow these simple steps:
Step 1: Choose the right location for your gate – Assess where you want to place your freestanding dog gate and ensure it is in an area where it will not get knocked over by people or pets.
Step 2: Measure the opening – Measure the width of the opening you intend to block with your dog gate. Ensure that both ends of the gate will fit snugly against walls or other barriers.
Step 3: Adjust the size of the gate – If needed, adjust the size of your freestanding dog gate by extending or compressing it until it fits properly within your selected opening.
Step 4: Lock in place – Once you have adjusted its size and positioning, lock your freestanding dog gate in place by tightening its locking mechanism or pressure mounts.
Tips for Proper Dog Gate Installation
While installing a freestanding dog gate can be relatively easy, there are some important tips you should keep in mind to ensure proper installation:
- Always measure carefully before purchasing a freestanding dog gate so that you can choose one that fits perfectly into your intended space.
- If you have large dogs or dogs who like to jump over things, consider choosing a taller freestanding dog gate.
- Make sure that any locking mechanisms on your freestanding dog gates are properly engaged before using them.
- Avoid placing heavy objects on top of your freestanding dog gate, as this could cause it to topple over.
Once you have chosen a dog gate, follow the instructions to install it properly. The gate should be secure and should not wobble or shake.
Tips for uncommon entry door types
- Sliding Doors: For sliding door installations, use a gate specifically designed for sliding doors or pressure-mounted gates with extensions. Ensure the gate is level and secure.
- Pocket Doors: Installing a dog gate in a pocket door opening can be challenging. Use a pressure-mounted gate or consult a professional for a custom solution.
- French Doors: To install a dog gate in a French door opening, use a freestanding or pressure-mounted gate that spans the width of the opening. Make sure the gate is stable and doesn’t impede the door’s functionality.
FAQ Dog Gate Installation
- How do I choose the right dog gate for my home?
Choosing the right dog gate starts with considering your dog’s size, activity level, and any specific needs. Measure the width of the doorway or area where you plan to install the gate and ensure the gate’s height is appropriate for your dog’s size. - Should I opt for a pressure-mounted or hardware-mounted dog gate?
Pressure-mounted gates are easy to install and suitable for areas where you need temporary containment. Hardware-mounted gates provide more stability and are ideal for long-term use or for larger, more active dogs. - Can I install a dog gate on uneven surfaces?
Yes, you can! Some dog gates come with adjustable extensions or panels that can accommodate uneven surfaces. Additionally, you may need to use shims or other leveling tools to ensure a secure fit. - Do I need any special tools for installing a dog gate?
Typically, most dog gates come with installation instructions and the necessary tools, such as screws, brackets, or tension knobs. However, it’s always a good idea to have a basic toolkit handy, including a drill, screwdriver, and measuring tape, for any unforeseen adjustments. - How do I ensure a sturdy installation?
For hardware-mounted gates, follow the manufacturer’s instructions carefully, ensuring the gate is securely attached to the wall or doorframe using appropriate screws and brackets. Double-check the gate’s stability and perform regular inspections to ensure it remains secure. - Can I install a dog gate without damaging my walls or doorframes?
Yes! Many gates offer non-damaging options, such as pressure-mounted gates with rubberized pressure pads. Alternatively, you can use temporary adhesive hooks or removable mounting brackets specifically designed to prevent damage. - Can I install a dog gate at the top of a staircase?
Absolutely! Safety is paramount when it comes to staircases. Look for gates explicitly designed for top-of-stair installation, ensuring they have a secure latch system and are hardware-mounted for maximum stability. - Can I customize the width of a dog gate to fit my space?
Some dog gates come with extensions or panels that allow you to customize their width. Measure the area accurately and choose a gate that offers the necessary adjustments to fit your specific requirements. - Are there any additional safety measures I should consider?
Yes, indeed! While a dog gate provides containment, it’s essential to supervise your dog and ensure they cannot climb or jump over the gate. Additionally, avoid placing objects near the gate that could aid an escape. - Can I remove the dog gate easily if needed?
Most gates are designed for easy removal when necessary. However, hardware-mounted gates may require more effort to disassemble, so consider the gate’s portability if you anticipate frequent removals.
Remember, the key to successful dog gate installation is a careful balance of practicality and enchantment. So, let your imagination run wild as you create a safe haven for your beloved furry companion!


